TEFAL STMC STEAM'UP WHITE

STMC STEAM'UP WHITE With Steam'up, steam cooking is truly tasty !

Enjoy new possibilities and reveal all the flavor of your daily meals by steaming upside down! This patented, innovative technology steams downwards - directly inside your containers - allowing you to mix flavors and assemble all your ingredients - sauces included - in one single recipient. The result is full taste and perfect texture on a wide array of ingredients and recipes. With the Steam'Up steam cooker by Tefal, steam cooking is truly tasty!


Reference: VL504015

Steam'up food steamer: A new way to steam!

Steam has never tasted better! Introducing the Steam'up steam cooker by Tefal. Its innovative technology steams downwards right into the containers you already have at home*, allowing you to mix flavors to perfection by assembling all your ingredients - sauces included - in one single recipient. The result is full flavor on a wide array of ingredients and recipes. This delicate and homogeneous steam cooking preserves the character, vitamins and textures of your ingredients. Easy to use, the food steamer's eight automatic programs mean no more monitoring, with pre-settings for fish, vegetables, rice and more, as well as for defrosting, reheating, keeping warm. Easy to store thanks to its compact size, Steam'up is also a breeze to clean, since it never comes into contact with your food - just wipe it with a wet sponge. Now go get steaming!

*from 16 to 28 cm in diameter

Essentials
  • With Steam'up, steam cooking is truly tasty!

    Enjoy all the healthy benefits of steam cooking plus much more taste, thanks to patented, innovative technology that steams downwards - directly inside your containers, allowing you to mix flavors and assemble all your ingredients - sauces included - in one single recipient. Prepare delicious meals you never thought you could with steam!

  • Steam cooking is as easy as 1,2,3

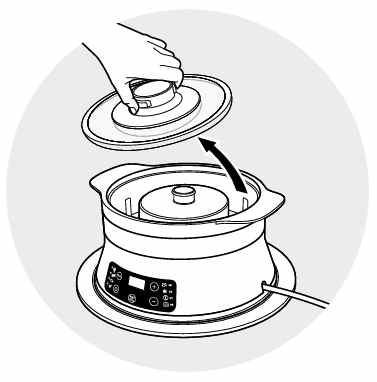
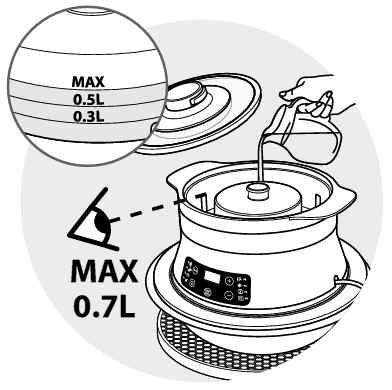
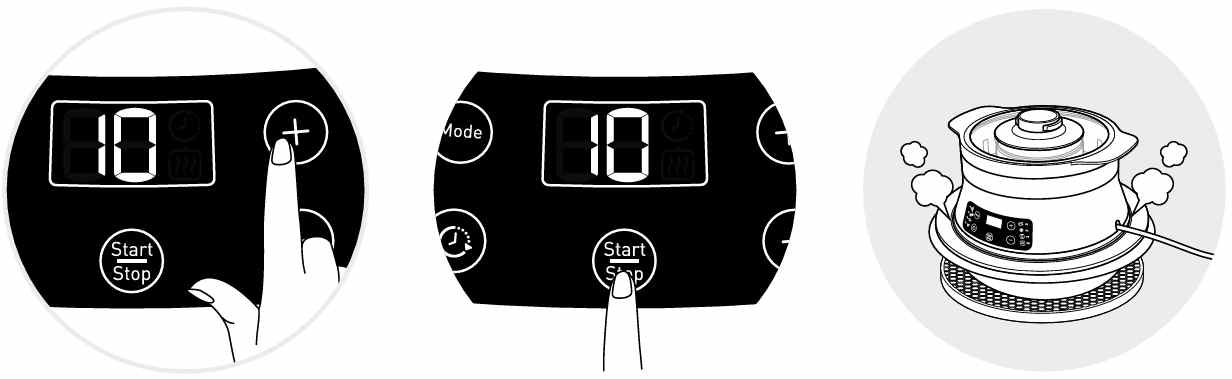
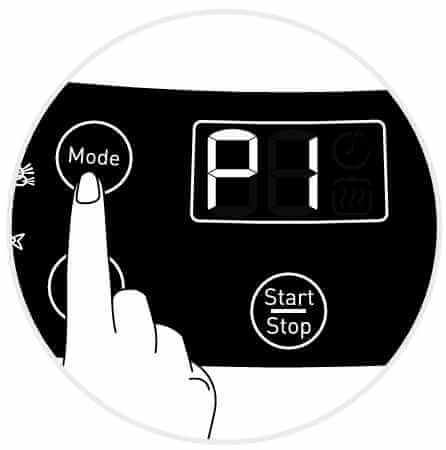
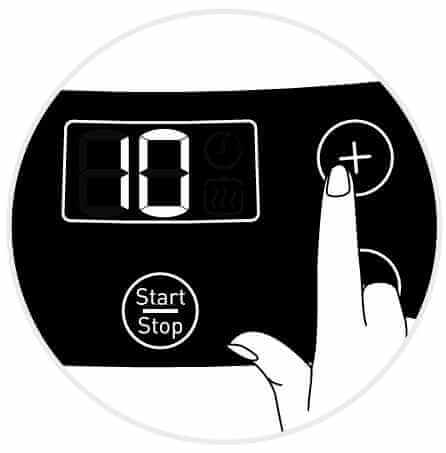
    1. Put all your ingredients in the same recipient
    2. Fill up the water tank
    3. Put Steam'up upon your recipient and select a cooking mode


  • Get inspired everyday

    Prepare delicious meals you never thought you could with steam: silky and tender coconut-milk salmon, Asian wok with crisp, flavorful veggies, smooth chocolate fondant... Enjoy 30 delicious recipe ideas in the included booklet, plus a hundred more online, for varied, tasty meals every day.
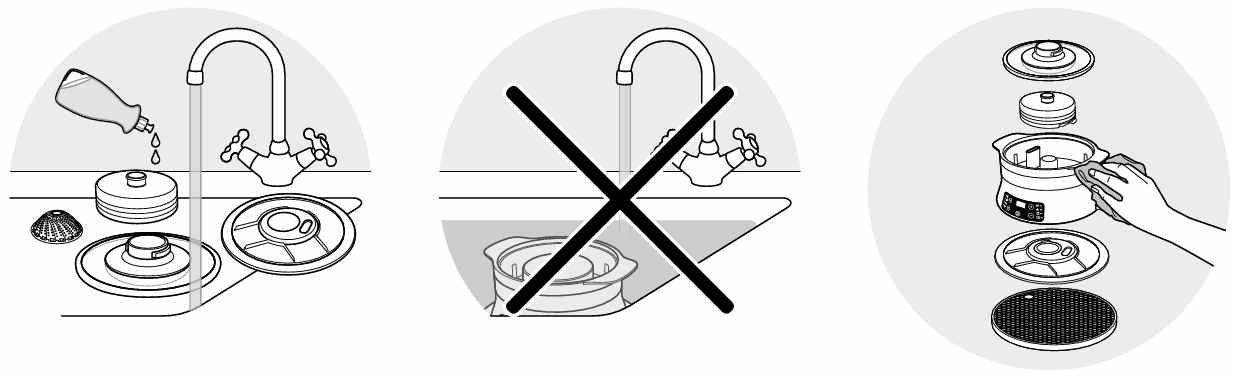
  • Easy to clean

    Just wipe it with a wet sponge and it's clean!
    Steam'Up cooks directly into your containers, with no contact with food. The only thing left to clean is the container itself.

  • Easy to store

    Easy to store thanks to its compact size, making it perfect for any kitchen. For even more space, put Steam'Up right on your stove pile.

  • No more predetermined compartments to cook your ingredients with steam!

    No more predetermined compartments to cook your ingredients with steam! Place your ingredients in containers you already have at home (either round or square, large or small, Steam'up fits them all*).

    * from 16 to 28cm wide.

  • 8 preset cooking programs.

    Including 3 comfort modes.

  • Steam basket and table mat included.

  • 700 ml water tank for 45 minutes autonomy.

Features
Power 550  W
Recipes included    
Recipes Recipe book with 30 recipes, 100 recipes available online  
Accessories Steam basket, Table mat  
Capacity Depending on the container used  
Timer (water cooking) Digital  
Easy storage    
Water level indicator    
External water filling    
Keep warm MANUAL  
Colours White  
Power cord length 1,20  m
Frequency 50-60  Hz
Voltage 220-240  V
Instructions & Manual
Frequent questions
The WiFi icon, especially visible from the home screen, indicates whether your product is connected or not.

WiFi icon crossed outThe product is not connected.
WiFi icon exclamation markThe product is connecting.
WiFi iconThe product is connected.
Your account, to be created from the app, allows you to benefit from additional services related to the interaction of your app with your product:
• Find the recipes saved in your notebooks and favourites directly on the robot's screen.
• Follow remotely the progress of the recipe on your product and receive recipe notifications.
• Display on your product a recipe that you have selected in the application.


From the home page of your device, go to "Settings" and select "Associate an account".
• Download the application on your smartphone from the Google Play store or the App Store.
• From the app, add the product you own and then create an account or sign in.
• An association code is generated. Enter it in your application.
Even if your product doesn't need a very fast WiFi connection to work, the received WiFi signal must still be stable.
If the screen displays a connectivity error, you can move the product closer to your box or add a WiFi repeater (see FAQ 'I don't have WiFi access in my kitchen').
If your product loses the WiFi connection during a recipe, you will be able to finish your recipe without any inconvenience.
However, the videos of that recipe will no longer be accessible until the connection is re-established.
If the WiFi connection is interrupted during an update, this cannot be completed. Your product will be able to reboot to its current version and this update will be rescheduled the next time you start it.
If your smartphone loses internet connection (WiFi or 4G) during a recipe it will have no impact on your product which will be able to execute the recipe without any problem. You will simply no longer be able to follow the progress of the recipe remotely on your smartphone and you will no longer receive notifications about the end of a step or the addition of an ingredient.
Your product can only be associated with one account.
However, any application that is connected to this account can interact with this product.
If you have a tablet and a smartphone, or if other members of your household want to interact with your product, they can simply connect their application using your account.
As soon as an update is available, your product when it connects to the WiFi will suggest you to do the update.


Some updates are priorities for security reasons and you will need to perform them before you can use your product.
Others may be delayed. You can then perform them now or later by going to your product's settings.
If an update fails, you can download it again.
If despite several attempts you are unable to install it, move the product closer to your box, the connection from your kitchen may be too weak to download it.
If the update fails even close to your box, please contact our customer service.
Yes, your device can be used with several smartphones or tablets, even if your product can only be associated with a single account.
So if you own a tablet and a smartphone, or if other members of your household wish to interact with your product, they simply need to connect their application using your account.
If your product is associated with your user account, you will be able to follow the progress of your recipe on your application.
You will also receive end-of-stage or alert notifications.
If you do not receive these notifications, please enable them in your iOS or Android settings.
To remotely send a recipe from your application to your product, simply open a recipe and click on the icon with your product.
If your product is on standby, it will open on your product as soon as it connects to Wifi.
If the product is running, it will be displayed in a few seconds if your product is not already making another recipe.
Place your device on a flat, stable surface.
To obtain an optimal connection between your device and your box, it is recommended to position your device in a place where the Wifi signal received from your box is strong. You can test the connection by positioning your smartphone at the location of your product to see if the WiFi signal received at that location is strong enough.
If the connection is interrupted (connection symbol crossed out), please bring your device and your box closer together to reestablish the connection.
The presence of the fixed connection indicator (application or product) ensures that your devices are connected.
If your product loses the WiFi connection during a recipe, you will be able to finish your recipe without any inconvenience.
• From the home page of your appliance, go to "Settings" and select "Connectivity and Account".
• Download the app on your smartphone from the Google Play store or the App Store.
• From the app, create an account or log in to an existing account then add the product you own.
• Follow the different steps displayed successively on the product and on the app.
• An association code is generated. Enter it in your app.
Your Cookeo connects to WiFi using your phone:
• From the home page of your appliance, go to "Settings", select "Connectivity and Account" then "Activate connection".
• Follow the steps that will suggest you to download the app on your smartphone from the Google Play store or the App store.
• From the app, create an account or log in then add the product you own.
• Follow the different steps displayed successively on the product and on the app.

You need to enter a word in the search field.


The recipe search engine works by keyword. It is therefore preferable to enter the kind of food rather than "dessert" for example.

You must create an account and log in to your application to access this feature.
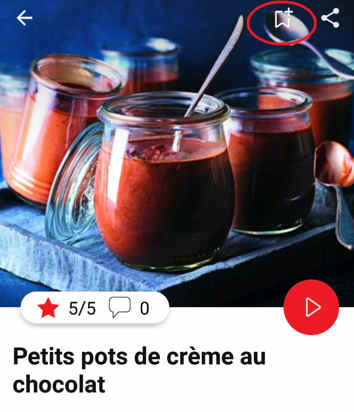
Go to the desired recipe and click on the ribbon at the top right of your screen.


Once selected, the application suggests you to choose in which booklet you want to save the recipe. Choose: the recipe now appears in the selected booklet which you will find in "My universe".

You must create an account and log in to your application to access these features.
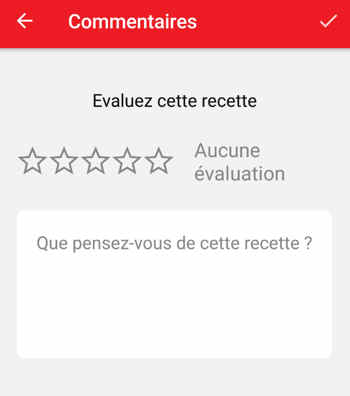
Once logged into your account, you will be able to rate the recipe and post a comment by following the instructions on the screen after clicking on the "What do you think of this recipe?" section highlighted below:

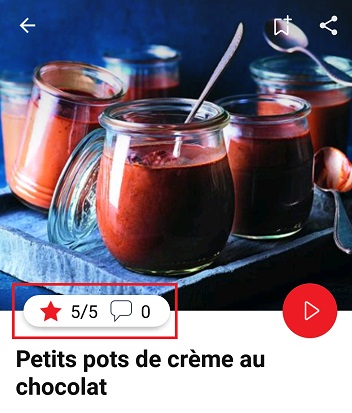
You must create an account and log in to your application to access these features.
Once logged in, you can read the comments and see the notes that the community members gave to the recipe by clicking on the "Notes/Comments" space highlighted below:
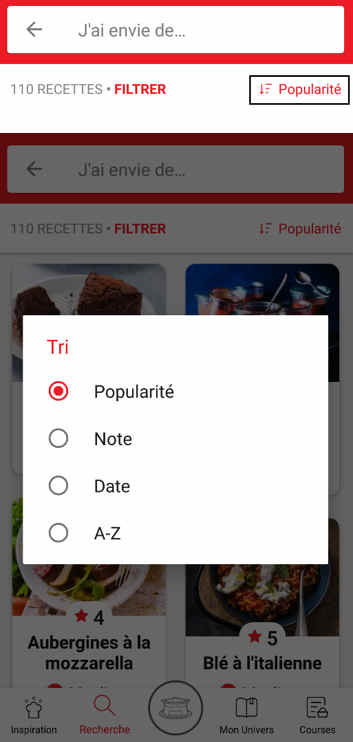
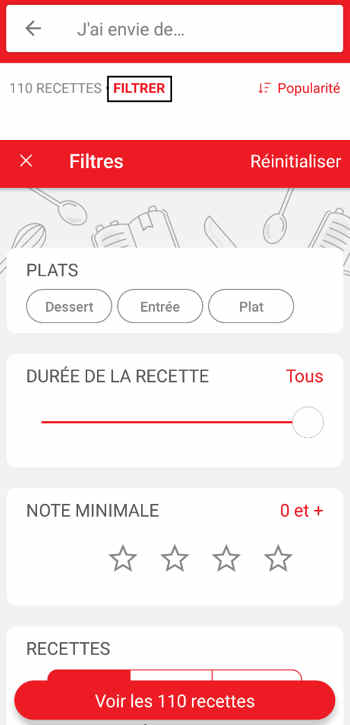
In addition to the search section, specific filters will help you to find recipes that match your needs more easily:

• Recipe sorting: click on the sorting icon below to sort recipes by popularity, rating, age or alphabetical order.


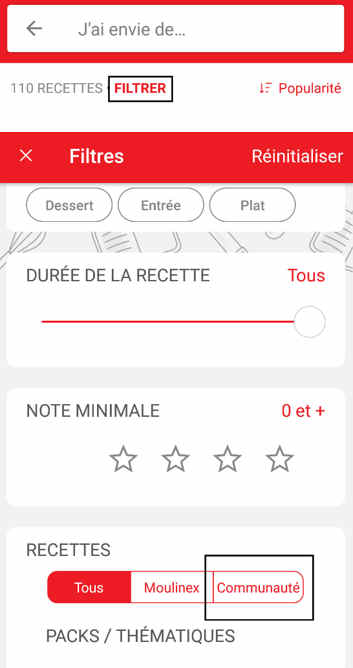
• The customizable filter: click on the pictogram below to sort the recipes according to their type, the completion time, the difficulty, the minimum rating, the occasions (Christmas, Birthday, Mother's Day...).
You can also choose to select only Moulinex recipes or recipes proposed by the community.
Click on the selected recipe you want to share. In the detailed recipe, click on the "Share" button and choose how you want to share it (Facebook or email).
It is possible to view the recipes created and shared by community members.
They are easily identifiable in the list of recipes by a pictogram and the nickname of their author under each recipe photo.
To see the latest published recipes, sort the recipes by "Most recent".
To filter on community recipes only, simply go to the customizable filters at the top of your screen, and select "Community" in the "Recipes" section.


Feel free to rate/comment the recipes from the community you prefer!
The app is no longer compatible on Android versions 4.4.4 or lower, because of reinforced data security.

As far as possible, we recommend that you update your device to a higher Android version or use another compatible device.

Updates will not only allow you to enjoy a richer experience with new features and compatibility with the latest technology, but will also protect you against possible security vulnerabilities that have been fixed in the latest versions.
Yes. You should never leave a small electrical appliance unattended whilst in operation. However, you do not have to watch the steamer all the time. Simply set the timer and the bell will let you know when your food is ready to eat. There are no risks of burning the food and no need to stir it.
Caution: Do not forget to put water in the tank.
All frozen vegetables can be steamed from frozen.
Yes, to give meat, chicken and fish a delicious moist flavour you can marinate them a few hours before steaming.
Try adding fresh herbs, lemon, garlic, oranges or even onion directly to the foods.
To add flavour to chicken, meat and fish made with marinades, use barbecue sauce or spice mixtures.
Yes, especially for recipes with long cooking times.
Also monitor the water level during cooking in case it needs refilling.
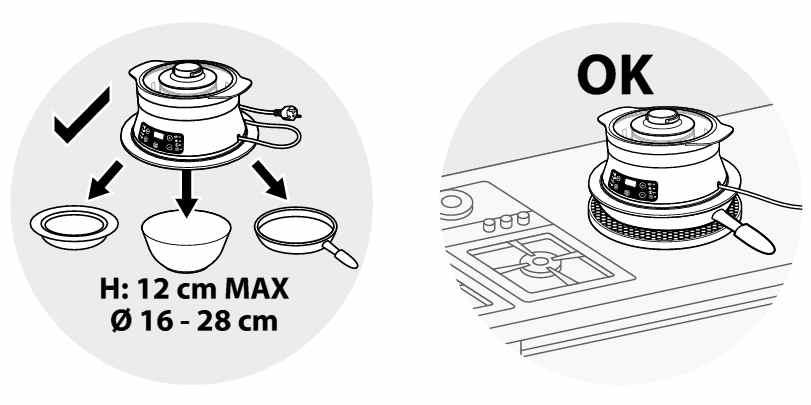
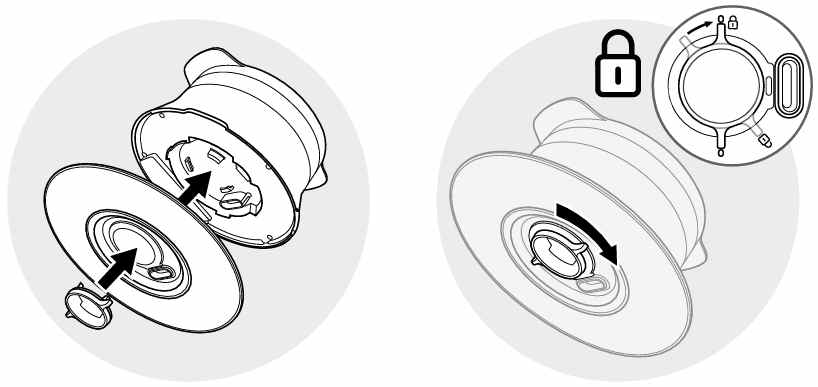
• Thanks to its silicone ring, Steam'up fits on any type of container from 16 cm to 28 cm wide. Check that the dish diameter is smaller than the silicone ring before using the appliance.
• The maximum height of the container must not exceed 12 cm.
• Steam'up can be used on any heat and humidity resistant container (aluminium, stainless steel, glass, ceramic...). Never use the device on plastic containers.


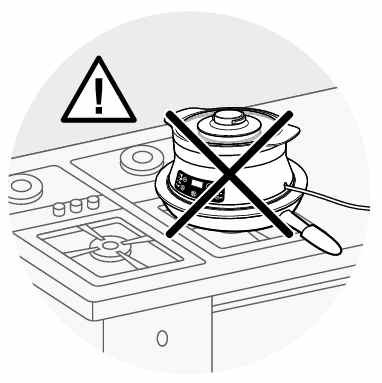
• The containers can be bowls, dishes, pots, pans... of any shape.
• Prefer a stable container. For the use of the steam accessory, choose a suitable container.
• Check the stability of the appliance above the container before starting a cooking cycle.
• Never use the device with its container on a hotplate or any hot surface.


• Steam may escape between the appliance and the dish, but this does not affect the cooking quality of the food.
• Remove the protective film from the screen.
• Remove the lid.


• Remove the turbo ring for cleaning.


• Unlock the silicone ring.


• Clean the water tank, the body and below the appliance using a damp, non-abrasive sponge.


• Wash all removable parts (lid, turbo ring, silicone ring, lock and steam accessory) using warm water and washing-up liquid, rinse and dry.


• Lock the silicone ring and put the turbo ring back.


• Place the appliance on a container which must be laid on a hot pad.


• Fill the tank with water to the maximum level.


• Plug the appliance


• Start one cooking cycle of 10 minutes, with no ingredients.


• Unplug the appliance.


• Allow it to cool to 20 minutes.


• Empty the water from the tank and rinse it several times with warm water.


• Never use the appliance without the silicone ring or the turbo ring.
• Never immerse the appliance in water.
The steam basket accessory must be used for cooking vegetables or frozen foods.
The water in your dish is normal. Indeed, the Steam'up steam goes directly into your container in order to cook your food.
The advantage of this cooking juice is that it is full of the flavours and vitamins of your ingredients. You can:
- either make a sauce with it, for example by adding cream.
- or keep it for later by keeping it cool and use it as a broth for cooking other stuff, thus there is no waste.

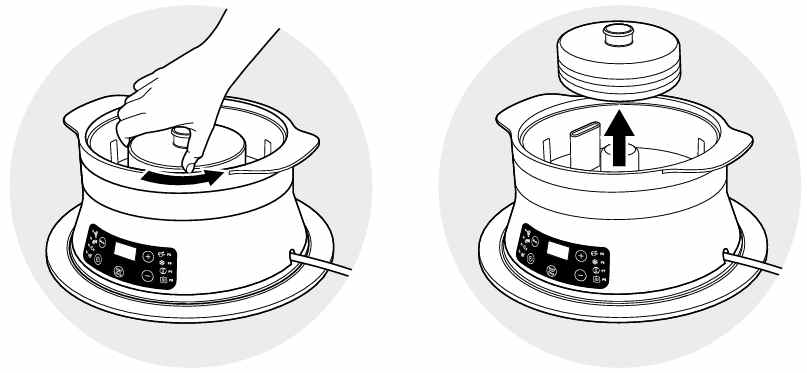
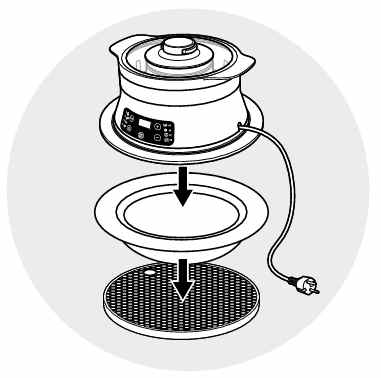
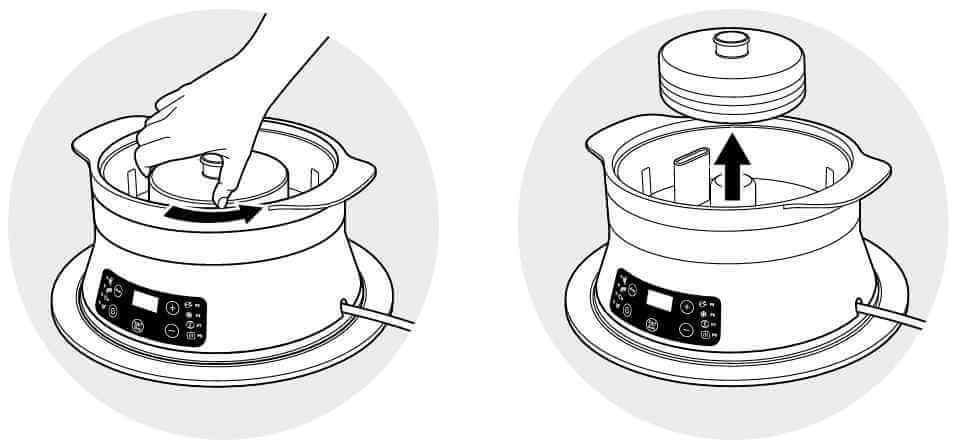
If, however, you want less water, you can:
- reduce this sauce by putting your container (e. g. a pan) over high heat, so that the water will evaporate.
- use the steam basket included with the Steam'up: your ingredients will be slightly lifted and will not come into contact with this water at the bottom of your container.
1. Select the automatic cooking programs:
• Press the "Mode" key until the desired program (P1 to P8) is displayed.


• It is possible to adjust the cooking time by using the "+/-" keys.


• To start cooking, press the "Start/Stop" key.


2. Select the manual mode:
• Program the cooking time using the "+/-" keys (refer to the cooking tables and recipes).


• To start cooking, press the "Start/Stop" key.


3. Which cooking program can I use?
If you are not sure which cooking mode to use, please refer to the cooking guide below:


• Start/Stop button: touch the white spot at the bottom of the screen to turn on your device.
• Touch screen: scroll the screen with your finger and select your feature.
• Back key: once you have selected a feature, a back button will appear at the bottom left to return to the previous screen. It does not appear when you are on the home screen.
On the home page, drag the menu to the right and select "Stand by".
Thanks to the function "In my fridge" you can indicate the ingredients that you have at your disposal and we will suggest suitable recipes.


• You can access this feature from the home screen.
• Add one or two ingredients by typing their name in the search bar and selecting it from the suggestions.
• You can then enter the weight of the added ingredients so that we can offer you recipes for those quantities.
To open the lid, press the lid lightly and turn counterclockwise.
Access the home menu using the "Contextual Menu" touch button on the right side of the screen. This button also allows you to return to the home page.

Access the home menu using the "Contextual Menu" touch button on the right side of the screen. This button also allows you to return to put your appliance on standby.

When your appliance is in standby, simply press the dot on the rotary knob to take it out of standby.
Thanks to the library, find the recipes integrated in your appliance. Thanks to the connection with your application, you'll have access to more recipes from the brand and the community!

• You can access the recipe library from the "Inspiration" menu.
• Keep in mind that if you are not connected to the WiFi, you will only have access to the list of recipes integrated into your appliance.
• When you are in the library, you can scroll through the recipes.
• You can find the recipe booklets that you created with the app.
• You can access the recipe library from "My Universe".
• Please note that if you are not connected to your user account, no recipe will appear.
• You have to go through the app to add or remove recipes from your booklets.
The list of cookings by ingredients offers you cooking times and cooking modes adapted to the quantity you have at your disposal.
There are 5 categories of food: Starches, Vegetables, Fishes, Meats and Eggs.
You can access the ingredients cooking list from the home menu under "Cooking ingredients".
• Use only food-grade vacuum bags specific for cooking (not for storage).
• Do not reuse airtight cooking bags.
• Do not use vacuum boxes.
Express cooking allows you to cook very quickly your recipes for soups, purees, compotes, meat chunks recipes, pasta or rice dishes...

What you need to know:
• The filling level of the bowl should never exceed the MAX level.
• For food that can expand during cooking (rice, seeds, lentils, peas, etc.), do not fill the bowl beyond half its maximum capacity.
• The bowl should always be filled with a minimum of 250 ml of liquid.
• When the timer reaches 0 and the following screen appears, you will notice a release of steam at the back of the lid.

CAUTION: Do not put your hands near the steam outlet!
It is possible that a slight flow of steam may escape from the back of the product during cooking.
Strong browning allows you to brown ingredients strongly and gives a golden and crispy appearance to all types of ingredients such as potatoes, meat...

Ingredients should never be filled above the MAX level. The lid must always be open.

You control the cooking time. Leave the ingredients to cook until you are satisfied with the result. Then click 'STOP' to stop cooking.
Medium browning allows you to brown ingredients and give a golden, crispy appearance to ingredients such as meats, vegetables...

Ingredients should never be filled above the MAX level. The lid must always be open.

You control the cooking time. Leave the ingredients to cook until you are satisfied with the result. Then click 'STOP' to stop cooking.
Soft browning allows ingredients to be gently browned and gives a golden brown appearance to more sensitive ingredients such as fish fillets.

Ingredients should never be filled above the MAX level. The lid must always be open.

You control the cooking time. Leave the ingredients to cook until you are satisfied with the result. Then click 'STOP' to stop cooking.
Soft simmering allows dishes such as meat stews to simmer slowly and gently "over a low heat".

Ingredients should never be filled above the MAX level. The lid must always be open.

You control the cooking time. Leave the ingredients to cook until you are satisfied with the result. Then click 'STOP' to stop cooking.
Medium simmering allows dishes such as meat stews to simmer slowly "over a medium heat".

Ingredients should never be filled above the MAX level. The lid must always be open.

You control the cooking time. Leave the ingredients to cook until you are satisfied with the result. Then click 'STOP' to stop cooking.
Strong simmering allows dishes such as meat stews to simmer "over high heat".

Ingredients should never be filled above the MAX level. The lid must always be open.

You control the cooking time. Leave the ingredients to cook until you are satisfied with the result. Then click 'STOP' to stop cooking.
The "Yogurt" mode is accessible in the "Miscellaneous" manual modes.
The "Sous vide" mode is accessible in the "Miscellaneous" manual modes.
• Low temperature cooking is ideal for long cooking times, up to 12 hours, with the lid closed for a tender and very melting result.
• Classic simmering is used with the lid open to thicken or reduce a sauce at the end of cooking.
• The "Sous vide immersion" mode cooks the vacuum-sealed ingredients and immersed in 3L of water.
• The "Sous vide Eco" mode cooks the ingredients with only 5 cl of water using the steam basket.
• The "Gentle steam" mode is ideal for healthily cooking delicate ingredients such as fish and seafood.
• The "Boost steam" mode is more suitable for meat or vegetables.
Gentle low temperature cooking allows you to simmer dishes such as meat stews "on a low heat", with slow and gentle cooking at 75°C.

Ingredients should never be filled above the MAX level. The lid must always be closed.

You control the cooking time. Leave the ingredients to cook until you are satisfied with the result. Then click 'STOP' to stop cooking.
Strong Low temperature cooking allows dishes such as meat stews to be simmered "over medium heat", with slow cooking at 85°C.

Ingredients should never be filled above the MAX level. The lid must always be closed.

You control the cooking time. Leave the ingredients to cook until you are satisfied with the result. Then click 'STOP' to stop cooking.
Classic simmering allows you to heat from below like in a Dutch oven, to concentrate the flavors.

Ingredients should never be filled above the MAX level. The lid must always be open.

You control the cooking time. Leave the ingredients to cook until you are satisfied with the result. Then click 'STOP' to stop cooking.
No, wash all removable parts (lid, turbo ring, silicone ring, lock and steam accessory) with warm water and washing-up liquid, rinse and dry.
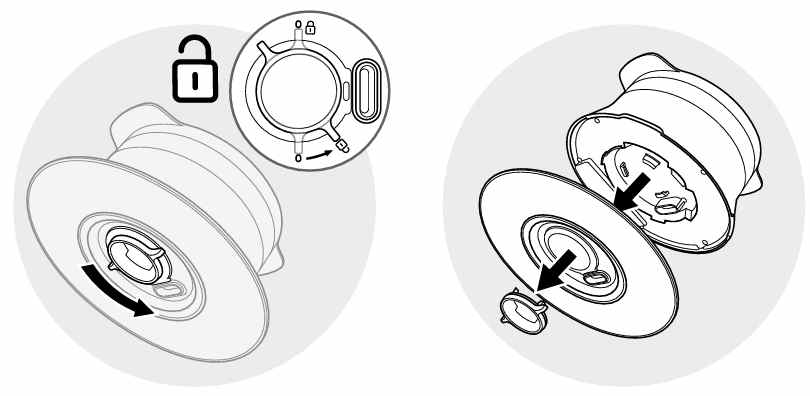
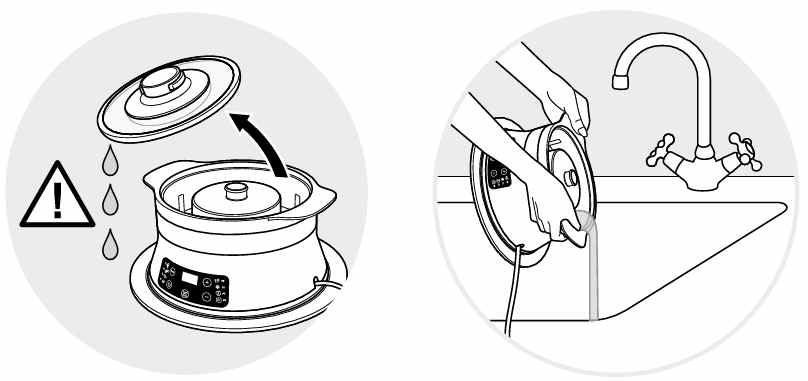
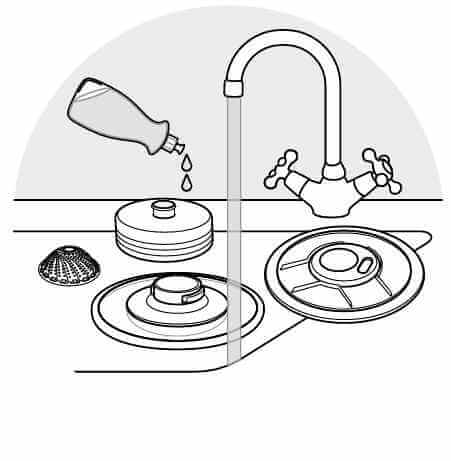
For best results, descale your device after every 10 uses.
To do this:
• Pour white vinegar into the tank up to the mark 0.3L. Complete with water up to MAX level.
• Leave it to descale overnight.
• Empty the tank containing the water and vinegar. Rinse the tank several times with warm water. Never use abrasive cleaning products.
• After each use, unplug the appliance.


• Allow it to cool completely before cleaning and then check that the appliance has cooled completely before emptying the water tank.


• Remove the turbo ring.


• Remove the silicone ring.


• Use a damp, non-abrasive sponge to clean the water tank, body and underneath the appliance.


• Wash all removable parts (lid, turbo ring, silicone ring, lock and steam accessory) with warm water and washing-up liquid, rinse and dry.


• Do not immerse the appliance in water. Do not use abrasive cleaning products.
The appliance has not been descaled after 7 to 10 uses: descale it.
Do not use your appliance. To avoid any danger, have it replaced by an approved repair centre.
1. Check that the lid opening handle is in the open position.
2. Unscrew the nut on the metal lid.

Wait until the device is cold to unscrew the central nut and remove the lid.
Please check the WiFi icon on your product.

WiFi icon crossed out
Your product is not connected to the WiFi (via the modem or via a mobile phone).
Therefore, you can only access the 250 recipes contained in your product.
We advise you to check that WiFi is activated on your modem/phone and to get closer to your modem/phone.
We remind you that your product cannot connect to a 5GHz WiFi network, a WiFi network with a password containing special characters, as well as open WiFi networks (which do not require a password).

WiFi icon exclamation mark
Your product is connected to the WiFi (via modem, mobile phone,...), but not connected to the database.
Therefore, you can only access the 250 recipes contained in your product.

WiFi icon
Your product is connected to the WiFi (via modem, mobile phone,...) and to the database. As a result, you can access more than 1,500 recipes.
• From the home menu, select "Settings".
• In "My appliance", you can choose three brightness levels.
1. Check that the appliance is not in standby mode by pressing the rotary knob.
2. Make sure that the power cable is connected to the power supply.
3. If the product is powered, unplug the power cord for 10 - 15 seconds and then plug it back in.
If the problem persists, contact our customer service or take your appliance to an approved service centre.
To view the images, it is necessary to authorize the downloading of photos via a Wi-Fi connection. This validation takes place at the initial startup of the device.
This setting can be changed in the "Settings" section of the Cookeo.
All non-Touch 6L capacity models have compatible pots.
The Touch model has its own pot which is not compatible with the other models.
No, the 3L pot is specific to 3L capacity models.
The 3L pot cannot replace the 6L pot, nor can it be fitted into it.
The jars, their lids and the holders* can be washed in the dishwasher.

* 8 jars set (ref. XA6140E0)
6 jars set (ref. XA606000):
You can place 4 jars underneath and 2 jars on top.
Be careful to place the two upper jars towards the front to prevent them from tipping over or hindering the lid from closing.

8 jars set (ref. XA6140E0):
You can place the 8 jars with the 2 supports of 4 jars one on top of the other in the bowl.
No, they can only be used with the modes: pressure cooking, reheating.
Yes, they are compatible with its 4 cooking modes without their lids.
The jars can be used in a temperature range between -20°C and 150°C.
The steam cooker doesn't cook under pressure, it instead uses the ambient pressure.
The steam in the steam cooker is water boiling temperature, approximately 100°C.
Please go to the “Accessories” section of the website to easily find whatever you need for your product.
Find more detailed information in the Guarantee section of this website.
Steam'up has 3 great advantages:
- Lift the flavours, the aromas: thanks to the cooking of all the ingredients in the same container, the flavours are mixed.
- Ability: the Steam'up adapts to all your dishes (round or square from 16 to 28 cm).
- Practical: it is easy to store (small footprint), easy to wash, 45 minutes autonomy.
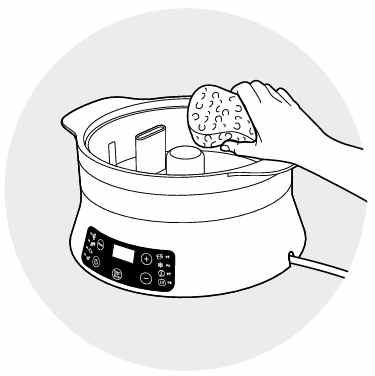
No, but use the steam accessory for frozen ingredients, for steam cooking without mixing ingredients and without sauce, or as indicated in the recipes provided.
Do not use the steam basket for rice, cereals and vegetables as water is necessary for the proper cooking of these ingredients.
No, do not use seasoning or liquid other than water in the tank.
Take your device to a recycling center or waste disposal facility.
If you believe a part is missing, please contact our customer service center and we will help you find an appropriate solution.